Master the art of eyeliner application with this detailed eyeliner tutorial crafted for both beginners and makeup lovers. From subtle lines to bold wings, learn how to apply eyeliner like a pro with confidence and precision.
Eyeliner is a confidence booster, a mood enhancer, and a creative expression when it comes to beauty. Whether you’re prepping for a boardroom presentation or a night out, knowing how to apply eyeliner like a pro can dramatically elevate your overall look. But getting both eyes to match, mastering the perfect flick, or even drawing a steady line can feel intimidating. It intensifies when you’re just a beginner in makeup.
This comprehensive eyeliner application tutorial simplifies the process. From choosing the right formula for your eye shape to breaking down application into foolproof steps, we’ve crafted a beginner-to-pro guide that demystifies eyeliner like never before. So you can finally master that clean, smudge-free line every time.
Why Eyeliner Matters in Your Makeup Routine?
Eyeliner is a finishing touch. It defines your eyes, enhances your features, and adds instant glam. If mascara lifts your lashes, eyeliner defines your gaze. It’s that one product that can turn sleepy eyes into a sultry stare or give soft features a bold edge.
Eyeliner holds the power to shift your entire aesthetic, all from barely-there tightlining that subtly intensifies the lash line, to winged eyeliner that demands attention.
If used correctly, eyeliner enhances your natural eye shape, balances out facial symmetry, and adds drama where needed. It’s also one of the most versatile tools in your makeup kit. Eyeliners have the ability to complement a bare face just as beautifully as it does a full glam look.
Whether you’re a minimalist or makeup maximalist, incorporating right eyeliner into your daily routine offers a quick, effective way to refresh and refine your appearance before any event.
From professional meetings to casual brunches, eyeliner adapts. It empowers. And you don’t need to be a makeup artist to make it work. All it takes is the right technique and a little practice.
How to Choose the Right Tools and Eyeliner Type?
When it comes to achieving a precise and professional eyeliner look, choosing the right product is half the battle won. Understanding the types of eyeliner and gathering the correct tools will set you up for success, whether you’re aiming for a soft daytime line or a dramatic wing.
Pencil, Liquid, or Gel? Choose What Suits You
Not all eyeliners are created equal and the type you choose can significantly impact both your application and final look. Here’s a quick guide to help you pick the one that best suits your skill level, lifestyle, and aesthetic preference:
| Type | Best For | Recommended For |
| Pencil Eyeliner | Everyday use, subtle definition | Beginners, minimal makeup users |
| Liquid Eyeliner | Sharp lines, wings & cat eyes | Intermediate to pros |
| Gel Eyeliner | Smokey looks, long wear | Makeup lovers who want drama |
Beginner Tip: Start with a pencil eyeliner. It’s forgiving, easy to control, and perfect for practicing technique. Once you’re comfortable, graduate to gel or liquid for more precision and drama.
Essential Tools for Flawless Eyeliner Application
A great eyeliner look isn’t just about the product, it’s also about the preparation. These tools can help streamline the process and correct small errors effortlessly:
- Q-tips or Cotton Swabs: Ideal for fixing small smudges or sharpening your wing.
- Angled Eyeliner Brush: A must-have for gel liners and for creating precise edges.
- Micellar Water or Makeup Remover: For clean-up and correcting mistakes without disturbing the rest of your makeup.
- Magnifying Mirror or Tabletop Mirror with Lighting: Gives better visibility and control, especially for winged or detailed looks.
- Tissue or Blotting Paper: Helps control oil on eyelids before application for a smudge-free result.
Pro Tip: Keep these tools within arm’s reach to avoid interruptions during your application process.
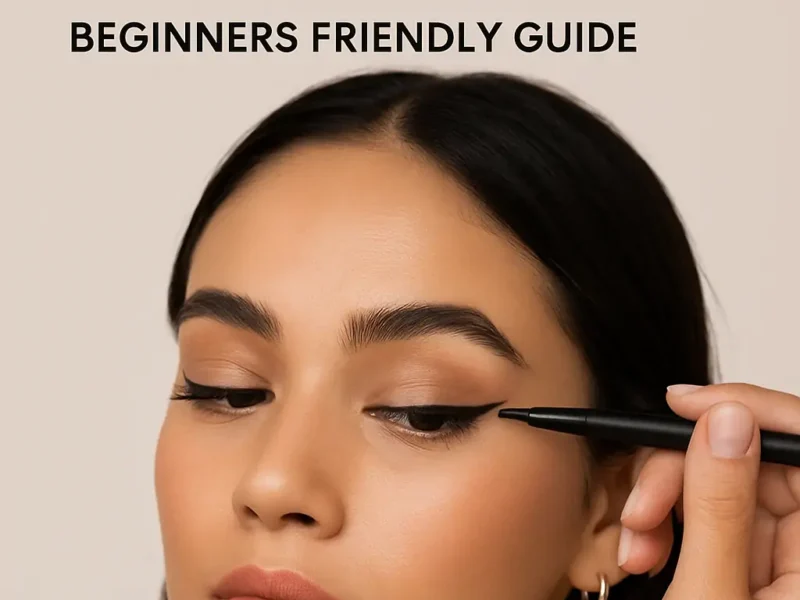
How to Apply Eyeliner: Step-by-Step Tutorial 2025
Learn exactly how to apply eyeliner like a pro with detailed instructions. Whether you prefer pencil or liquid liner, this section walks you through prep, application, and finishing touches.
Step 1 – Prep Your Eyes for a Smooth Base
A clean canvas ensures a smooth and smudge-resistant finish.
Start by gently cleansing your face, focusing on the eye area to remove any oil, sweat, or leftover makeup. Follow up with a lightweight eye cream or moisturizer — but keep it minimal on the lids. Next, apply an eyeshadow primer or a dab of concealer on your eyelids. This not only helps your eyeliner grip better but also prevents unwanted creasing and fading throughout the day.
Why this matters: Prepping your lids improves longevity, sharpness, and overall control during application.
Step 2 – Apply a Guide Using Dots or Dashes
Perfect for beginners — the dot method keeps your lines even and foolproof.
If freehand drawing feels overwhelming, use the connect-the-dots technique. Begin by gently placing 3 to 5 small dots or short dashes along your upper lash line, start from the inner corner and move outward. Make sure they follow the natural curve of your eyelid.
This not only simplifies the process but also gives you a precise guide to follow without committing to a solid line right away.
Beginner tip: Rest your elbow on a flat surface to stabilize your hand for better control.
Step 3 – Connect the Line and Adjust the Shape
Fill in the lash line and build your preferred thickness gradually.
Once your guide is in place, slowly connect the dots using short, controlled strokes. Stay close to the lash line for a natural effect, or gradually thicken the line as you move outward for a more dramatic look. If you’re using a liquid liner, apply with a light hand and allow the product to dry before layering.
This step is where your signature eyeliner style begins to take shape, whether it’s thin and tightlined or thick and bold.
Step 4 – Create the Perfect Wing (Optional but Iconic)
This step teaches you how to do a winged eyeliner based on your eye shape, from hooded to almond eyes.
The wing is where technique meets artistry. Begin by identifying the angle: a good rule of thumb is to follow the line from your lower lash toward the tail of your brow. Draw a small diagonal flick outward, then connect it back to your lash line to form a triangle. Fill it in carefully. Eye shape tips:
- Hooded Eyes: Keep the wing slightly upward and thinner to avoid hiding it in the crease.
- Almond Eyes: Most styles work well — experiment with both short and extended wings.
- Round Eyes: Elongate the eyes by starting the wing from the center and flaring outward.
Pro tip: Use a small piece of tape angled from the outer eye toward the brow to guide your flick if you’re unsure.
Step 5 – Clean Up and Set for the Day
Seal your eyeliner with a matte shadow or powder to extend wear and reduce smudging.
Even the steadiest hand can slip. Use a Q-tip dipped in micellar water or concealer to clean up any uneven edges or smudges. To lock your eyeliner in place, lightly press a matching eyeshadow or translucent powder over the liner using a fine brush, especially if you have oily lids.
This final step helps your liner last longer and keeps your look fresh all day without touch-ups.
Common Eyeliner Mistakes and How to Avoid Them
Even seasoned makeup lovers slip up with eyeliner. From uneven wings to over-pulling your eyelid, here’s how to sidestep the most common eyeliner errors and achieve a clean, professional finish every time.
Mistake 1: Tugging Too Hard on the Eyelid
While it might seem like pulling your eyelid taut gives better control, it often leads to uneven lines once your skin relaxes. Instead, keep your eye relaxed and look slightly downward into a mirror. Practice steady hand movements rather than stretching the skin.
Mistake 2: Uneven or Mismatched Wings
This is perhaps the most frustrating — one wing perfect, the other… not so much. To fix this:
- Use guiding dots or tape for symmetry.
- Start both wings with light sketch lines before filling in.
- Always step back and check balance with your eyes open.
Mistake 3: Applying Over Oily Eyelids
Natural oil on your eyelids can break down eyeliner, causing smudges or fading. Always clean the lids first, apply a primer or concealer, and consider setting the base with powder before using liner.
Mistake 4: Using the Wrong Formula for Your Skill Level
Liquid liners may look glamorous but can be tough to control for beginners. If you’re still learning, opt for a pencil or gel liner. Once your hand gets steadier, you can graduate to liquid for sharper results.
Mistake 5: Not Letting the Liner Dry (Especially Liquid)
Blinking right after applying liquid liner often results in upper lid transfer. To avoid this:
- Keep your eyes slightly closed for 10–15 seconds.
- Fan them gently or use a cotton swab to prevent contact.
Mistake 6: Skipping Cleanup
Mistakes happen — and skipping cleanup leaves them noticeable. Keep micellar water and Q-tips on hand to sharpen lines, clean edges, or remove extra product with precision.
Eyeliner Quick Fixes to Save the Day
- Smudge your mistake into a smokey liner look.
- Cover uneven edges with a matching eyeshadow.
- Conceal around the liner with a tiny brush and concealer for crispness.
Pro Reminder: Eyeliner is a skill, not a talent. The more you practice with the right techniques, the better you get. And yes, even pros use tape, Q-tips, and redos. So why not you?
Long-Lasting Eyeliner Tips Straight from Makeup Artists
When your eyeliner disappears halfway through the day or leaves a shadowy imprint above your lid, it’s more than just frustrating, it’s a makeup meltdown. Fortunately, the secret to smudge-proof, all-day eyeliner lies in a few simple tweaks that professionals swear by. Here’s how to make your eyeliner stay put, no matter your skin type or the weather.
1. Start With a Matte Base
Oily lids are the #1 enemy of long-lasting eyeliner. Always prep your eyelids with a mattifying primer or a small amount of translucent powder before application. This helps absorb oil and gives your liner something to grip.
2. Use Waterproof or Long-Wear Formulas
Not all eyeliners are built to last. Look for tags like “waterproof,” “smudge-proof,” or “long-stay” on the packaging. Gel and liquid liners generally offer longer hold than pencil formulas.
Pro picks:
- Maybelline Eye Studio Gel Liner
- Lakmé Absolute Shine Line
- Sugar Cosmetics Graphic Eyeliner Pen
3. Set Cream or Gel Liner with Powder
Once you’ve applied your eyeliner, lock it in by tapping a matching eyeshadow over it using a fine brush. This layering trick acts like a sealant and keeps the product from melting or shifting.
4. Avoid Heavy Creams Around the Eye Area
Your under-eye concealer or eye cream might be sabotaging your liner’s longevity. Avoid oily products near the lash line, or set them properly with powder before applying eyeliner.
5. Don’t Skip the Drying Time
If you’re using liquid eyeliner, patience is essential. Let it dry fully before blinking or layering mascara. A few seconds of drying can mean hours of smudge-free wear.
6. Blot Before You Begin
Before applying eyeliner, gently blot your eyelids with tissue or oil-absorbing paper to eliminate any moisture. This step is especially helpful during humid weather or if you have naturally oily skin.
7. Carry a Mini Touch-Up Kit
Even the best products can falter on long days. Keep a mini eyeliner pen, Q-tip, and blotting paper in your purse for quick on-the-go fixes, especially if you’re heading to events or shoots.
Best Eyeliner Styles to Experiment With Based on Your Vibe
Your eyeliner can be as understated or expressive as you want it to be. Whether you’re aiming for boardroom polish or weekend drama, there’s a style to match every mood, moment, and makeup personality. Here’s how to tailor your eyeliner vibe:
Minimalistic: Tightlining
The “invisible eyeliner” trick. Tightlining involves applying eyeliner directly to your upper waterline to subtly define the lash line without visible product. It’s ideal for work days, no-makeup makeup looks, or when you want fuller lashes without bold lines.
Best with: pencil or gel eyeliner
Tip: Use a waterproof pencil and avoid blinking until it sets.
Dramatic: Winged or Cat Eye
A timeless classic that elongates and lifts the eye. Winged eyeliner adds instant flair and works beautifully for parties, evening events, or when you simply want to feel fierce.
Best with: liquid eyeliner or gel.
Tip: Match your wing angle to your lower lash line for symmetry.
Creative: Double Wing or Colored Liners
Want to stand out? Layer two wings, one classic black and one with color, or go full glam with electric blues, metallic greens, or graphic white liners. Ideal for fashion-forward looks, festivals, or Insta-worthy content.
Best with: colored pens or liquid liners
Tip: Keep the rest of your eye makeup neutral to let your liner shine.
Soft Glam: Smudged Gel or Kohl
Smokey, soft, and sensual. Smudging a gel or kohl liner creates a hazy effect that’s perfect for date nights or soft-glam evenings.
Best with: gel or kohl pencil
Tip: Use a smudging brush or your ring finger for a soft, diffused finish.
Eyeliner Product Recommendations for Beginners
Here are some beginner-friendly eyeliners that deliver consistent results, whether you’re practicing your first flick or perfecting your everyday tightline:
Maybelline Colossal Kajal
{Product Image}
Best for: Daily use, tightlining, smudge-proof wear.
India’s cult-favorite kajal, this pencil glides smoothly, lasts all day, and doesn’t budge — perfect for everyday definition and beginner application.
Lakmé Insta Liner
{Product Image}
Best for: Practicing liquid liner looks on a budget.
This old-school hero is affordable, easy to use, and gives a solid matte finish. It’s ideal for those experimenting with winged eyeliner without burning a hole in their wallet.
L’Oréal Paris Gel Intenza Eyeliner
{Product Image}
Best for: Long-wear, high-impact eye looks.
A creamy gel liner that comes with its own brush, offering strong pigment and excellent hold. It’s the perfect step-up product once you’re confident with your basics.
These picks cover different eyeliner types — pencil, liquid, and gel — so you can find your comfort zone and explore your style without overthinking your cart.
Final Takeaway
Eyeliner is about drawing a line that defines your confidence, your style, and your mood in a single stroke. Whether you’re aiming for minimal chic or full-on drama, mastering eyeliner starts with the basics: the right tools, the right technique, and a little bit of patience.
Don’t be discouraged by uneven wings or smudges in the beginning. Every pro was once a beginner fumbling with a shaky hand and mismatched flicks. With consistent practice, the steps become muscle memory. And soon enough, you’ll be applying eyeliner like a pro, no mirror panic required.
So go ahead. Experiment with textures, explore new styles, and most importantly, have fun with it. Your perfect eyeline is just a few strokes away.
Loved this tutorial? Subscribe to Cosmeq for more expert beauty how-tos, product guides, and trend updates.
Join the Conversation
Comments are closed for this article.